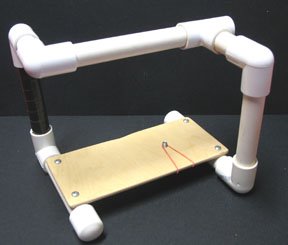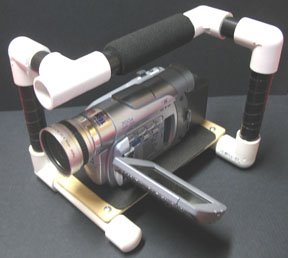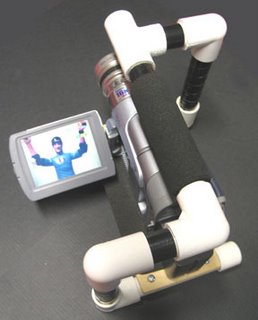
The StreetGrip:
Every time you see a camera guy in skate videos, you see that they have really nice cameras (XL or GL whatevers). Well, I don't, and don't have the money to get one. One of the biggest practical differences between their cams and my JVC generic is the handle on top. That would make filming all kinds of things SO much easier. During all of my "stabilizer/jibarm/boom" searches, I have never found a DIY for such a handle. So here's mine! Perhaps the first of the web! It is a super simple design using PVC pipe. This rig is super light and super CHEAP! Even if it does look extremely cheesey. But it's the footage that counts, right?
This is not a comprehensive DIY. This is a straight forward build. (ie: Cut your pipe using a hacksaw, use a drill for the holes... duh...) Just look at the pics and you can see how simple this rig really is. You certainly need to measure your camera and adjust your pipe lengths as needed. Be sure to do a "dry fit" before you permanently glue anything.
For a JVC-or cam of similar size and shape:

(4) 5" pvc pipes (1/2" diameter)
(1) 6" pvc pipe
(2) 2 1⁄4 pipes
(5) elbow joints
(1) T joint
(2) endcaps
(4) little screws
(1) thumbscrew ("quarter 20" standard cam mount screw)
(1) washer (fits with thumbscrew)
(1) 3 1⁄2 x 7 wood slat (strong craft wood will work
just fine)
(1) rubber band
PVC primer and glue
Electrical tape (cosmetic addition)
Craft foam
This grip breaks down to 4 pieces for more compact storage. You can substitute whatever with whatever you feel is appropriate(or available). The T-joint is actually optional and you can build this with a 6th elbow joint. The first one I built did not use the T-joint and did not break down (I glued every joint). It's still getting enthusiastic use by fellow skater and vid enthusiast, Skid-S. The T-joint will allow the addition of a sun shade over the lense. (Haven't constructed that yet.) While the rig does appear to offer some cam protection, I don't suggest using it as a protective cage really. You could build a more extensive cage I suppose, but that's not the purpose of this rig, nor this blog.
It is important to glue the joints that hold weight vertically, so your camera can't drop away from the handle. Depending on how often you assemble/dissassemble the rig, it may be necessary to eventually glue all of the joints. The other joints should be ok with a tight fit, as long as your not flinging the thing around. (If you are, your footage will suck anyway, and your building this to prevent suckage, right?)
Glue the 2 upright components. (2 elbows and one 5" section each) I also glued the handle component (6" pipe, elbow, T, and both short pipes). (Note: I added some grip foam-the kind that goes over old 10-speed bike handles-before I glued the handle together. For comfort and more importantly, style.) Predrill then attach the platform centered on the 2 remaining 5" pipes. Measure where the cam mounting screw hole should be for your cam and drill it. Glue end caps on the platform pipes (double check which corners!). As you can see, I added more craft foam for a bit o' cushion between the cam and the platform, I just used double sided tape - not a super bond, but as long as I don't fuss with it, it ain't going anywhere. I also wrapped electrical tape around the uprights, again, more for style than anything else. (It hides all the construction printing on the pipes.) Tada! Your StreetRig puzzle is ready for assembly. Oh, the rubberband is to hold the thumbscrew in place when the cam isn't mounted.
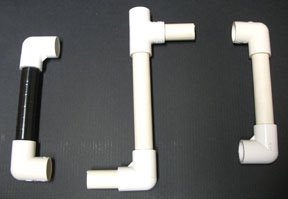

The correct (easy) assembly order is: 1) connect 1 upright to platform, 2) connect handle to THAT upright, 3) connect last upright to handle and platform simultaneously. To mount the cam, I hold my cam upside down in one hand and place the rig platform (upside down) on the cam, line up the holes and insert the thumbscrew. There you have it... a simple, lightweight, cheap handle for your cam. Now go practice with it and get better footage of your friends skating (or whatever).
